http://bits-please.blogspot.com/2015/08/effectively-bypassing-kptrrestrict-on.html
As we’ve seen in the previous blog post, sometimes exploits require knowledge of internal kernel pointers – either in order to hijack them, or in order to corrupt them in a controllable manner.
This fact has been known for quite some time – enough time, in fact, for it to be addressed directly. The Linux kernel contains a feature which enables it to filter out such addresses in order to avoid leaking them to a potential attacker. This configurable feature is called “kptr_restrict”, and has been present in the Android kernel source tree for at least two years.
As with nearly all configurable kernel parameters, there exists a special file which allows to set the way in which this feature behaves when attempting to filter kernel addresses. In the case of kptr_restrict, the file resides in “/proc/sys/kernel/kptr_restrict”, but has some daunting permissions set:
Essentially, only root can modify its value, but any user can read it.
So how does kptr_restrict work? Well, first of all, kernel developers needed a way to mark kernel pointers as such, whenever those are outputted. This is achieved by using a new format specifier, “%pK”, which is used to denote that the value written into that specifier contains a kernel pointer, and as such, should be protected.
There are three different values which control the protection offered by kptr_restrict:
- 0 – The feature is completely disabled
- 1 – Kernel pointers which are printed using “%pK” are hidden (replaced with zeroes), unless the user has the CAP_SYSLOG capability, and has not changed their UID/GID (to prevent leaking pointers from files opened before dropping permissions).
- 2 – All kernel pointers printed using “%pK” are hidden
The default value of this configuration is chosen when building the kernel (via CONFIG_SECURITY_KPTR_RESTRICT), but for all modern Android devices that I’ve ever encountered, this value is always set to “2”.
However – how many kernel developers actually know of the need to protect kernel pointers by using “%pK”? The can be easily answered by grepping the kernel for this format string. The answer is, as expected, quite sad:
Merely 35 times (in 23 files) within the entire kernel source code. Needless to say, kernel pointers are very often printed using the “normal” pointer format specifier, “%p” – a simple search shows many hundreds of such uses.
So now that we’ve set the stage, let’s see why the protection offered by kptr_restrict is insufficient on it’s own.
Method #1 – Getting dmesg from shell
All log messages printed by the kernel are written to a circular buffer held within the kernel’s memory. Users may read from this buffer by invoking the “dmesg” (display message) command. This command actually accesses the buffer by invoking the syslog system call, as you can see from this strace output:
However, the syslog system call can’t be accessed by just any user – specifically, the caller must either posses the extremely powerful CAP_SYS_ADMIN capability, or the weaker (and more specific) capability of CAP_SYSLOG.
Either way, most Android processes do not, in fact, have these capabilities, and therefore can’t access the kernel log. Or can they? 🙂
Recall that within Android, the “init” process maintains a list of “services” which can be started or stopped as needed. These services are loaded by “init” upon boot, from a hard-coded list of configuration files, which are almost always stored on the root (read-only) partition, and are therefore read-only.
The configuration files are actually written using a language specific to Android, called the “Android Init Language“. This language is pretty simple and easy to use, and allows full control over the permissions with which services are launched (UID/GID) as well as their parameters and “type” (for more information about the language itself, check out the link above).
Another feature of Android are “system properties” – these are key-value pairs which are maintained by the “property service”, which is also a thread within the init process. This service allows basic access-control on various “sensitive” system properties, which prevents users from freely modifying any property they please.
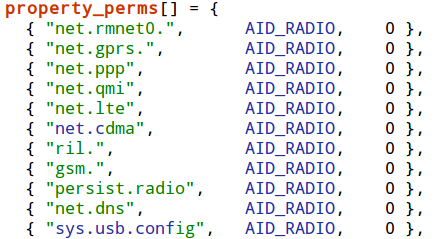
These access-permissions for most properties used to be (until Android 4.4) hard-coded within the property service (since Android 5, the permissions are handled by using SELinux labels instead):
However, some properties get special treatment, namely – the “ctl.start” and “ctl.stop” system properties, which are used to either start or stop system services (defined, as mentioned before, using the “Android Init Language”).
These properties are checked strictly using SELinux labels, in order to make sure that the privilege of modifying the status of system services is reserved strictly to certain users.
But here comes the surprising part – when connecting locally to the device using “adb” (Android Debug Bridge), we gain execution as the “shell” user. This user is always permitted start and stop one particular service – “dumpstate”. Actually, this is used by a feature offered by the “adb” command-line utility, which enables developers to create bug reports containing full information from the device.
Running “adb” with this command-line argument (or simply executing “bugreport” from the adb shell), actually starts the “dumpstate” service by setting the “ctl.start” system property:
So let’s take a look at the configuration for the “dumpstate” service:
Since the service has no “user” or “group” configurations, it is actually executed with the root user-ID and group-ID, which could be quite dangerous…
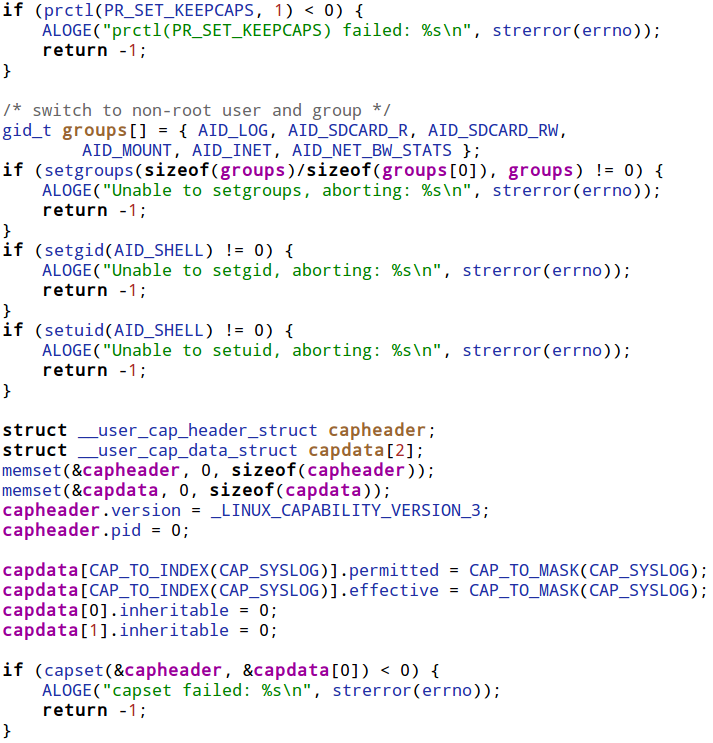
Luckily, the developers of the service were well aware of the potential security risks of running with such high capabilities, and therefore immediately after starting, the service drops its capabilities by modifying its user-ID, group-ID and capabilities, like so:
In short, the service sets the user and group IDs to those of the shell user, but makes sure that it keeps the CAP_SYSLOG capability explicitly.
Reading on reveals that “dumpstate” actually reads the kernel log using the syslog system call (which it is capable of executing since it has the CAP_SYSLOG capability), and writes the contents read back to the caller. Essentially, this means that within the context of the “adb shell”, we can freely read the kernel log simply by executing the “bugreport” program. Nice.
However, this still doesn’t solve the problem of getting needed symbols for exploits – since, as mentioned earlier, these symbols should generally be printed using the “%pK” format specifier, which means they would appear “censored” in the kernel log.
But alas, most pointers within the kernel are certainly not printed using the special format specifier, but instead use the regular “%p” format, and are therefore left uncensored. This means that the kernel log is typically a treasure trove of useful kernel pointers.
For example, when the kernel boots, the memory map of the kernel’s different segments is printed, like so:
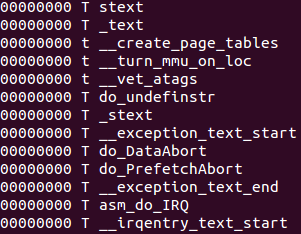
Now, assuming there’s a single symbol we would like to find, we could simply dump the list of all kernel symbols using the virtual file containing all the symbols – /proc/kallsyms. When kptr_restrict is enabled, the list returned by kallsyms is censored (since it is printed using “%pK”), and therefore won’t show any kernel pointers.
However, the symbols returned by kallsyms are ordered by their addresses, even if those addresses aren’t shown. Moreover, this task is made easier due to the fact that each segment is prefixed and postfixed by specially named marker symbols:
| Segment Name | Start Marker | End Marker |
|---|---|---|
| .text | _text | _etext |
| .init | __init_begin | __init_end |
| .data | _sdata | _edata |
| .bss | ___bss_start | __bss_end |
We can then use this list to deduce the location of different symbols by simply counting the number of symbols from the start or end marker to our wanted symbol, while adding up the sizes of each of the symbols encountered.
Another technique would be to cause a wanted kernel pointer to be written to the kernel log. For example, on Qualcomm-based devices (based on the “msm” kernel), whenever the video device is opened, the kernel virtual address of the video device is written to the kernel log:
Assuming you have the full access to a live device, you could read the kernel image directly from the MMC, via /dev/block. However, in most cases reading the MMC blocks directly requires root permissions, which would make this method pretty obsolete, since with root access we could already disable kptr_restrict.
The more reasonable path to obtaining the kernel image would be to simply download the firmware file for your particular device, and unpack it. There are many tools which enable firmware unpacking for different devices (for example, I wrote a script to unpack to Nexus 5’s bootloader – here), but many such tools are available, and are typically a google-search away.
Just one word of caution – make sure you download the exact kernel image matching the kernel on your device. You can find the running kernel’s version by simply running “uname -a“:
I have the image – now what?
This means that all we need to do in order to rebuild this table from a raw kernel binary is to understand the exact format in which this symbol table is written. However, for a normally compiled kernel with no additional symbols, this turns out to be a little tricky.
Since the labels written by the script are not visible in the resulting kernel binary, the first thing we’d have to solve is how to find the beginning of the symbol table within the binary. Luckily, the solution turns out to be pretty simple – remember when we previously had a look at the symbol table from kallsyms? The first two symbols were marker symbols pointing to the beginning of the kernel’s text segment. Since the kernel’s code is loaded at a known address (typically, 0xC0008000), we can search for this value appearing at least twice consecutively within the binary, and attempt to parse the symbol table’s structure starting at that address.
Going over the symbol table itself, reveals that it is terminated by a NULL address. Then, immediately following the symbol table, the actual number of symbols is written, which means we can easily verify that the table is actually well-formed.
Then, two tables of “markers” and “symbols” are written into the file. This is done in order to compress the size of the symbols within the table, and by doing so reduce the size of the kernel binary. The compression maps the 256 most used substrings (which are called tokens), into a single byte value. Then, each symbol’s name is compressed into a pascal-style string of bytes (meaning, a byte marking the length of the string, then an actual string of characters). Each byte in the compressed name maps to a single tokens, which in turn corresponds to a single “most commonly used” substring. Putting it together, it looks like this:
According to kernel developers, this usually produces a compression ratio of about 50%.
I’ve written a python script which, given a raw kernel binary, extracts the full symbol table from the binary, in the exact same format as they are written within kallsyms. You can find it here. Please let me know if you find the script useful!
Method #3 – Finding information disclosures within the kernel
This is the “classical” method which is commonly used in order to bypass the restrictions imposed by kptr_restrict. For a remote attacker wishing to target a wide variety of devices, it is quite often the best choice, since:
- The first method typically requires shell access to the device, in order to execute the “bugreport” service
- The second method requires you to obtain the kernel image, which could be tiresome to do for a very wide variety of devices
Sadly, it appears that kernel developers are far less aware of the possible risks of leaking kernel pointers than they are of other (e.g., memory corruption) vulnerabilities.
As a result, finding a kernel memory leak is usually a very short and simple task. To prove this point, after poking around for five minutes on a live device, I’ve come across such a leak, which is accessible from any context.
Whenever a socket is opened within Android, it is tagged using a netfilter driver called “qtaguid”. This driver accounts for all the data sent or received by every socket (and tag), and allows some restrictions to be placed on sockets, based on the tag assigned to them. Android uses this feature in order to account for data usage by the device. The actual per-process breakdown is done by assigning each process a specific tag, and monitoring the data used by the process based on that tag.
The driver also exposes a control interface, with which a user can query the current sockets and their tags, along with the user-ID and process-ID from which the socket has been opened. This control interface is facilitated by a world-accessible file, under /proc/net/xt_qtaguid/ctrl.
However, reading this file reveals that it actually contains the kernel virtual address for each of the sockets which completely uncensored:
Looking at the source code for the virtual file’s “read” implementation, reveals that the address is written without using the special “%pK” format specifier:
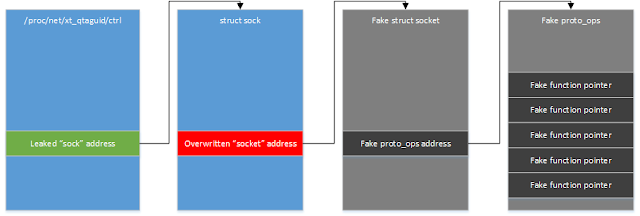
For those interested – the actual pointer written is to the “sock” structure, which is the kernel structure containing the actual “socket” structure, which in turns contains all the function pointers to the operations within this socket.
This means that if, for example, we have a vulnerability that allows us to overwrite a specific kernel address (like the vulnerability presented in the previous blog post), we could simply:
- Open a socket and tag it with “qtaguid“
- Look for the socket’s address within /proc/net/xt_qtaguid/ctrl
- Overwrite the pointer to the “socket” structure to an address within our address-space
- Populate the overwritten address with a dummy “socket” structure containing fully controller function pointers
- Perform any operation on the socket (like closing it), in order to cause the kernel to execute our own code
Summing it all up
Just like any other mitigation, kptr_restrict adds a layer of defence which can sometimes slow down an attacker, but is generally not a show-stopper for anyone determined enough. However, unlike most other mitigations, kptr_restrict requires the cooperation of kernel developers to be effective. Right now, things aren’t so great. Hopefully this changes 🙂


